Thursday 2 June 2016

Class success - a cotton skirt, Simplicity 2258

I started a 10-week dressmaking course in January, and chose to make Simplicity 2258 in the class.
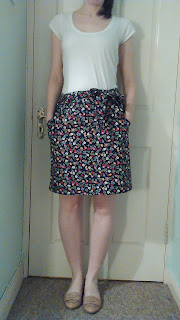
Finished skirt


Pattern: Simplicity 2258. It has a lot of pieces so not quite as easy as some beginner patterns. It's an elasticated skirt but has cleverly constructed fold-back pockets, and ties to hide the elastic, which makes it more interesting.

Love the pockets
Fabric: Lightweight 100% cotton from Hickeys, about €7 per metre.

Fit: Took it in 1 cm on each side, and added 4 inches extra to the hem, although most of this was incorporated into the hem which is 4 cm folded up twice. It was still a bit wide but once the elastic was added it was fine. I think there's a lot of ease in the pattern though.

The skirt folds up into nothing so will be perfect for summer holidays
Changes: The seams on the inside of the pockets are enclosed (French seam style). The seams on the waistband are also enclosed. These improvements were suggested by the lady giving the course. She also recommended a wide hem and showed me how to slip stitch properly as I made a bit of a dog's dinner of it first time round.

Overall: Learnt about trimming and clipping, attaching waistbands and hemming with the invisible slip stitch.

Wearability: I've worn it to work already. However, the cotton sticks like crazy to black tights, welding my legs together when I walk fast. I would need a slip or to go bare-legged to feel fully comfortable, but I'm more likely to wear it sans slip with the black tights again :). Although if this heatwave keeps up I may rethink that.


I like the extra detail that the ties add, as well as the curve of the pockets

Wednesday 13 April 2016

Tilly's Margot pyjamas - sewing success!

Starting three different sewing projects and one crocheting project at the same time may not have been the best idea! Finally some finished items to show off :)

Pattern: First up the Margot pyjamas from Tilly and the Buttons.

Fabric: I used a pink flannel that I purchased on a trip to the infamous fabric heaven that is GoldHawk Rd. I was so lucky to be able to visit there shortly after I purchased my sewing machine. I bought fabric for most of the patterns in Love at First Stitch on my visit. Back to the flannel, it was a bit fiddly to cut out as it kept sticking to itself. As you can see below I have lots left over. Maybe enough for a matching top!

Kitchen floor was the only space big enough!
Fit: I cut a straight size 4 as per my hip measurement, although my waist was size 3. I would probably go down a size, or 2 or 3 next time! The pj legs are quite wider, a lot wider than I'm used to, and that leaves a lot of extra fabric at the top of the leg/gusset area on the front, although they fit well at the back. Untied, below my natural waist I have about 5 inches of extra width. I cut 4.5cm off the length and used a 2mm hem.
Comfy flannel Margot pjs

The extra fabric doesn't look too bad here, but feels very roomy (even a bit breezy)  inside.
Changes: I decided I needed pockets, and French seams.

Very happy with my inseam pockets (my old pjs have fake ones - why?!)

Pocket love
I also decided to enclose all my seams as I'm not a huge fan of the zig-zag stitch so used french seams throughout, even on the crotch (slightly bulky due to the fabric), and the pockets are french seamed too. So happy I pulled that off. I followed a tutorial by the Slapdash Sewist for the pocket. I used the pocket pattern from Tilly's book and followed her advice on reinforcing with interfacing at the pocket mouths, although this did add to the bulk for the French seams.


French seams galore!
Once you get the mantra French seams are wrong  into your head these seams are easy peasy. Again there are lots of tutorials online showing this technique. (I should point out I came to the conclusion that there is no 'real' right or wrong side to the flannel so I just picked one and marked it).

French seamed inseam pocket, pinked seam at the mouth is the only visible seam
 I wasn't sure if the French seams would work out at the crotch but after some digging I found a great example online and realised it was possible and fairly straightforward.


French seamed crotch (one pressed to the front and one to the back to reduce bulk at the join)
Reinforcing the waistband opening for the ribbon was a bit tricky but I managed it after some pressing. I didn't like how close the waistband opening is to the edge of the waistband.  No room at all for straying slightly from the marked opening when reinforcing the opening. I would make the folded piece bigger next time. I didn't bother sewing my own drawstring.

Overall: A great learning project to make a practical, comfy piece of clothing. I plan to make a short pair for summer in a light cotton. They will have pockets and french seams too, although I will modify the pocket pattern slightly to reduce that extra bulk. I might also make them a wee bit bigger.

Tuesday 16 February 2016

Simplicity 2258 (sneak preview), Eason's new craft section, Tilly's Dominique skirt

The Simplicity 2258 is what I've chosen to make at my 10-week sewing course. Today I made facings! I had no idea what they were till I made one on the pocket of my skirt (you can read about them here), and it turned out so well. I had to trim and clip the seam allowances too which was a new technique to me but very easy and it works so well to form the curve. BHL describe the process clearly including the whys.

Look at that beautiful curve

I am based in Dublin and recently popped into Eason's to check out the new craft section. There's a fairly big section for icing/cake decorating, and they have a reasonable selection of sewing kit bits, although I can't vouch for the quality. I picked up these two, which are the main brand offered.

Prepared to make bias binding for a future Sorbetto
The only fabric they have is some quilting fat quarter bundles.

PS what do you think of Tilly's newly released pattern the Dominique skirts? My initial thoughts are yuck! They are not flattering. The short one has no shape and the long one seems frumpy to me. Seems a step down from her previous patterns, and rather disappointing. I'll see what everyone out there produces from the pattern but I don't think it's one I'll be tempted to buy. (I have the Love at First Stitch book which I love - such a lovely presented book - and have traced one half of a Margot pyjama bottom leg so there'll be more to come on that soon).


Friday 12 February 2016

First dressmaking item (and it's wearable)

I stocked up on some cheap practise fabric (aka duvet covers and pillowcases from charity shops) and decided the easiest piece of clothing to make would be a circle skirt.

I didn't use the helpful By Hand London circle skirt app (calculator), just because I wanted a different length, but followed another of Annika Victoria's tutorials. I love her just-get-in-there-and-have-a-go attitude, you can do it! She's good at mentioning how to fix mistakes too (useful). Watch her half circle skirt and circle skirt dress tutorials to see the making of the skirts in action (pause so you can figure out the calculations!), and the first shows you three different ways to hem so pick your favourite. However, I consulted  By Hand London on this and chose their #1 method, which was easy peasy but needed patience as the hem of a full circle skirt is very very long (will try a half circle next time).


Tadaaaaaaaa...........

My first clothing make. Love how the skirt lies. The fabric is not bad for an old duvet cover!
The only thing to watch out for with the blog directions in the birdeemag is that she forgot to say make the slit for the zipper shorter (to take into account joining on the waistband), but that's explained in the comments at the end. (I cut it too long but it was easily sewed up again).

And the back........

My first zipper insert, Annika's method was really straight forward to follow.

I 'designed' the skirt to sit low down on my hips, but this looked silly once it was made so I took it in an inch either side on the waistband to sit higher up (following tips from Annika and just using a straight stitch). My waistband ended up an inch shorter than designed too (due to drawing wonky lines + wonky cutting) so the skirt is shorter than intended, but still ok. 

Look I'm wearing a secondhand duvet cover!
It's great for twirling too (just watch out on a windy day).


Thursday 11 February 2016

Foray into sewing

Yey, it's very exciting. I had a cold, spent the day in bed gorging on sewing videos and blogs (inspired by my best friend's own sewing escapades), and suddenly I've signed up to a 10-week dressmaking course and own my own Brother (secondhand - nice find on gumtree). It's a XQ3700. Choosing a new machine is not easy for the beginner but the with the adjustable stitch length and width (necessities) and nice needle threader and top loading bobbin (luxuries), as well as a gizillion stitches I figured I couldn't go too wrong. The one-step button whole thing should be useful once I figure that out (down the line).

Bit of help setting up my machine from Tilly and the Buttons
 I got started on the basics and something very easy following a excellent tutorial from Annika Victoria
Bow taking shape (one nice corner, hehe)

Bit wonky (ok, alot), but I don't care - I made something!

 I'm a sewist now :)